INSERT statement in SQL Server is used for adding records in a table within the specified database. SQL Server performs insertion operation in two ways within a single query:
- Add data in a single row
- Add data in multiple rows
Syntax:
The following syntax of INSERT INTO command allows us to add single row in a table:
INSERT INTO [database_name].[dbo].[table_name]

(column_name1, column_name2, ... )

VALUES

(value1, value2, ... );
Parameter Explanation
The parameter descriptions of the above syntax are as follows:
- database_name: It indicates the database name that stored the table in which we are going to insert data. If we do not specify the database name, it will assume the current database by default.
- schema_name: It indicates the schema to which table belongs.
- table_name: It is the table name in which we want to add data.
- column_name1, column_name2…column_nameN: It is the name of our table columns.
- Value1, value2…valueN: It represents the list of values corresponding to the column’s name after the VALUES clause.
NOTE: The column name is optional. However, if we want to specify partial values, we need to specify its name mandatory. It also ensures that the column name and values and their position should be the same.
If we want to insert multiple records within a single command, we can use the following syntax:
INSERT INTO [database_name].[dbo].[table_name]

VALUES

( value1, value2,...valueN )

( value1, value2,...valueN )

...........

( value1, value2,...valueN );
SQL Server will add these values automatically to a column that exists in the table but doesn’t appear in the INSERT command’s column list:
- If the column has an IDENTITY property, it will add the next incremental value.
- If we define a default value for a column, it will add that value.
- If we have specified the column’s data type as a timestamp data type, it will add the current timestamp value.
- If the column is nullable, it will add the NULL value.
- If the column is a computed value, it will add the calculated value.
SQL Server Insert Data Example
Let us understand how INSERT statements work in SQL Server with the help of multiple examples. First, we will create a table “Student” in the database using the following command:
CREATE TABLE dbo.Student(

    Id INT IDENTITY PRIMARY KEY,

    Name VARCHAR(65) NOT NULL,

    Gender VARCHAR(20),

    Age INT,

    Marks INT

 )
Let’s insert data into this table as follows:
1. f we want to store single records for all fields, use the syntax as follows:
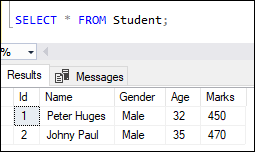
INSERT INTO Student (Name, Gender, Age, Marks)

VALUES ('Peter Huges', 'Male', 32, 450);
Here, we have not specified the Id column because it has an identity property that automatically inserts numeric data and increments each row. However, if we insert data for all columns, it is optional to specify the column names. Therefore, the INSERT statement can also be written as:
INSERT INTO Student

VALUES ('Johnny Paul', 'Male', 35, 470);
We can verify the data using the SELECT statement:
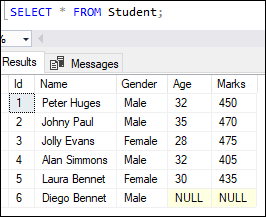
2. SQL Server also allows the user to insert more than one record within a single statement. The following command inserts three records at the same time:
INSERT INTO Student

VALUES ('Jolly Evans', 'Female', 28, 475),

('Alan Simmons', 'Male', 32, 405),

('Laura Bennet', 'Female', 30, 435);
Verifying the data will display the below output:

3. Sometimes, we want to store records without giving all column’s names. In that case, we can use the following statement where we specify only partial fields. All unspecified fields will add NULL value except the identity column.
INSERT INTO Student (Name, Gender)

VALUES ('Diego Bennet', 'Male');
This statement is executed successfully. Verifying the data will display the below output:
INSERT with SELECT statement:
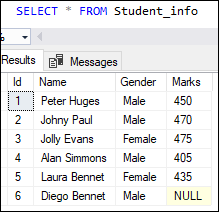
SQL Server also allows us to insert records from one table into another table using the INSERT INTO SELECT statement. Suppose we want to insert ‘Student’ table data into ‘Student_info’. We can do this by using the following statement:
INSERT INTO Student_info

SELECT Name, Gender, Marks FROM Student;
This statement is executed successfully. Verifying the data will display the below output:
To read more information, click here.
How to insert and return inserted values?
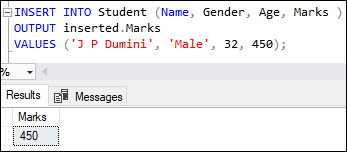
SQL Server provides the OUTPUT clause for capturing the inserted values into a defined table. We can explain this concept by using the below statement that inserts a new record into the ‘Student’ table and returns the inserted value of the ‘Marks’ column:
INSERT INTO Student (Name, Gender, Age, Marks )

OUTPUT inserted.Marks

VALUES ('J P Dumini', 'Male', 32, 450);
Here is the output:
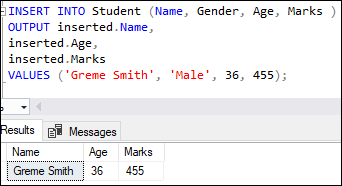
If we want to capture inserted values from multiple columns, we are required to specify the columns in the output as follows:
INSERT INTO Student (Name, Gender, Age, Marks )

OUTPUT inserted.Name,

inserted.Age,

inserted.Marks

VALUES ('Greme Smith', 'Male', 36, 455);
Here is the output:
How to insert explicit values into the identity column?
We know that SQL Server does not specify a value for the identity column explicitly because they automatically provide the value for this column. If we try to do this, we will get the following error message:
“Cannot insert explicit value for identity column in table ‘student’ when IDENTITY_INSERT is set to OFF.”
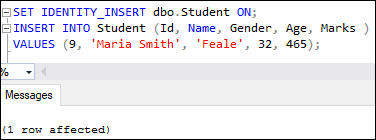
However, SQL Server allows inserting a value into the identity column explicitly in some situations, such as data migration. We can do this by executing the below statement before inserting a value into the identity column explicitly:
SET IDENTITY_INSERT table_name ON; Let’s execute the following statements to insert a value for the identity column in the Student table:
INSERT INTO Student (Id, Name, Gender, Age, Marks )

VALUES (9, 'Maria Smith', 'Feale', 32, 465);
After executing this statement, we can see that the statement is executed correctly.
Now, we can execute the below statement to switch the identity insert off:
SET IDENTITY_INSERT table_name OFF; This article helps to learn a complete overview of the INSERT statement in SQL Server for adding a new row into the existing table.
Leave a Reply