In this chapter, we are going to learn how to drop the PostgreSQL schema with the help of a drop schema command to delete a schema and its related objects if we don’t need it anymore.
We can easily drop or delete or remove a PostgreSQL schema with the help of the DROP schema statement. If the Schema is not present, it throws an error; that’s why we can use the IF EXISTS option with the DROP Schema command. We should be careful while deleting any schema because we will drop all the data and objects available in the particular Schema.
In PostgreSQL, we can drop the Schema in two different ways:
- PostgreSQL drop schema using psql
- PostgreSQL schema using pgAdmin 4
PostgreSQL Drop Schema using psql
In PostgreSQL, the drop schema command is used to delete a schema and its related objects from a database.
Syntax to Drop Schema
The syntax of the DROP SCHEMA command is as follows:
DROP SCHEMA schema_name;

or

DROP SCHEMA [IF EXISTS] schema_name [ CASCADE | RESTRICT ];
Here, we have different parameters that are used to drop the Schema. Let us see them one by one:
| Parameters | Description |
|---|---|
| Drop schema | It is a keyword, which is used to delete the schema. |
| If Exists | It removes the schema only if it exists. |
| Schema_name | The schema name is used to specify the name of the schema. |
| Cascade | It is used to remove schema and all the objects that rely on those objects. |
| Restrict | PostgreSQL uses the RESTRICT option by default, and it is used to remove only when the schema is empty. |
Note: For executing the DROP SCHEMA command, we must be the owner or a superuser of the schema, which we need to drop.
In PostgreSQL, we can drop the schema as well as the objects if it is not required.
- In psql, the below command is used to drop the schema:
Drop schema jtp; - Once we execute the above query, we may encounter the error. The particular error states that we cannot drop the schema jtp because some other objects depend on it.

- Therefore, firstly, we have to delete the dependent objects with the help of below command:
Drop schema if exist jtp cascade; 
Output
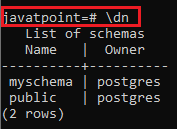
To see whether the schema is deleted or not, we will execute the below command:
javatpoint=# \dn The above command will display the schemas present in the PostgreSQL, and there are only two schemas ( myschema, public) available, which means that the jtp schema is deleted successfully.

Note: The PostgreSQL provides us to drop multiple schemas at the same time with the help of a single DROP SCHEMA command.
For example
We can delete multiple schemas present in the javatpoint database with the help of below command:
Drop Schema if exist myschema, public; PostgreSQL Drop Schema using pgAdmin4
For this, we are going to follow the below process to drop or delete the schema in pgAdmin4:
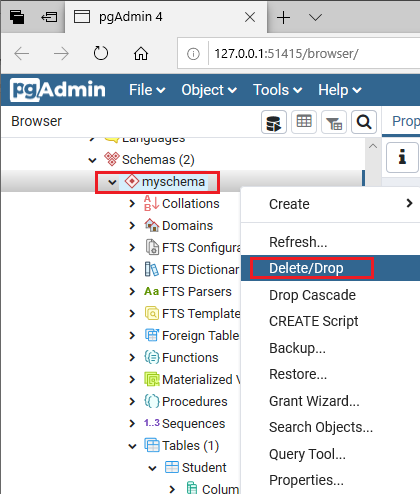
Step1
- Firstly, we will right-click on the myschema, which we created earlier and (the schema we do not require anymore) and select the Delete/ Drop option from the given drop-down list:

Step2
- Once we clicked on the delete\drop options, the drop schema popup will appear on the screen, where we click on the Yes button to delete the schema.

Step3
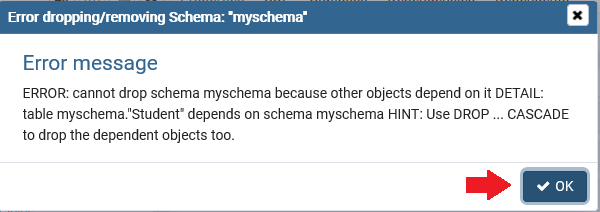
- Once we have clicked on the Yes button, the following error message popup will appear on the screen, where we will click on OK button as we can see in the below image:

Step4
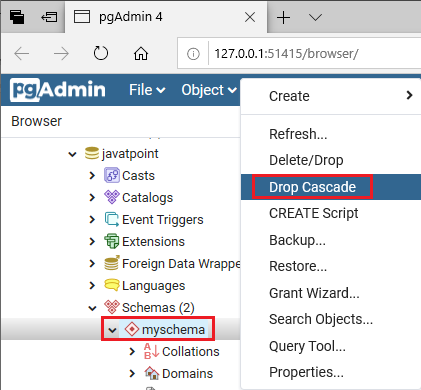
- To delete the schema, we will first drop the dependent object, and for this, we will right-click on the myschema and select the Drop cascaded option from the given drop-down list.

Step5
- The drop cascade schema popup window will appear on the screen, where we click on the Yes button for deleting the dependent objects.

- The myschema is automatically deleted after we delete the dependent objects.
Leave a Reply