A view is a database object that has no values. Its contents are based on the base table. It contains rows and columns similar to the real table. In MySQL, the View is a virtual table created by a query by joining one or more tables. It is operated similarly to the base table but does not contain any data of its own. The View and table have one main difference that the views are definitions built on top of other tables (or views). If any changes occur in the underlying table, the same changes reflected in the View also.
MySQL allows us to create a view in mainly two ways:
- MySQL Command line client
- MySQL Workbench
Let us discuss both in detail.
MySQL Command Line Client
We can create a new view by using the CREATE VIEW and SELECT statement. SELECT statements are used to take data from the source table to make a VIEW.
Syntax
Following is the syntax to create a view in MySQL:
CREATE [OR REPLACE] VIEW view_name AS

SELECT columns

FROM tables

[WHERE conditions];
Parameters:
The view syntax contains the following parameters:
OR REPLACE: It is optional. It is used when a VIEW already exists. If you do not specify this clause and the VIEW already exists, the CREATE VIEW statement will return an error.
view_name: It specifies the name of the VIEW that you want to create in MySQL.
WHERE conditions: It is also optional. It specifies the conditions that must be met for the records to be included in the VIEW.
Example
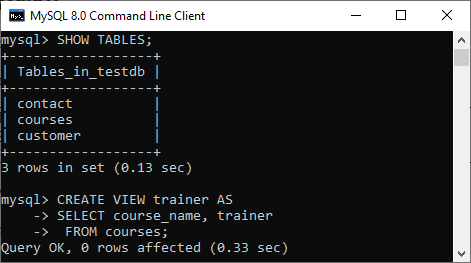
Let us understand it with the help of an example. Suppose our database has a table course, and we are going to create a view based on this table. Thus, the below example will create a VIEW name “trainer” that creates a virtual table made by taking data from the table courses.
CREATE VIEW trainer AS

SELECT course_name, trainer

 FROM courses
Once the execution of the CREATE VIEW statement becomes successful, MySQL will create a view and stores it in the database.
To see the created VIEW
We can see the created view by using the following syntax:
SELECT * FROM view_name; Let’s see how it looks the created VIEW:
SELECT * FROM trainer;
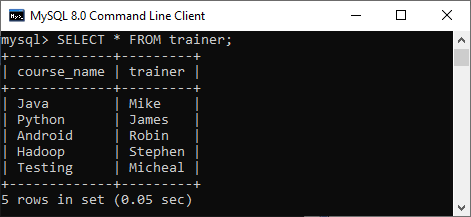
NOTE: It is essential to know that a view does not store the data physically. When we execute the SELECT statement for the view, MySQL uses the query specified in the view’s definition and produces the output. Due to this feature, it is sometimes referred to as a virtual table.
MySQL Update VIEW
In MYSQL, the ALTER VIEW statement is used to modify or update the already created VIEW without dropping it.
Syntax:
Following is the syntax used to update the existing view in MySQL:
ALTER VIEW view_name AS

SELECT columns

FROM table

WHERE conditions;
Example:
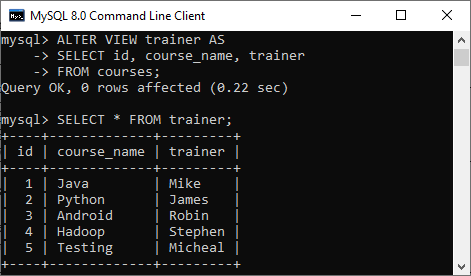
The following example will alter the already created VIEW name “trainer” by adding a new column.
ALTER VIEW trainer AS

SELECT id, course_name, trainer

FROM courses;
Once the execution of the ALTER VIEW statement becomes successful, MySQL will update a view and stores it in the database. We can see the altered view using the SELECT statement, as shown in the output:
MySQL Drop VIEW
We can drop the existing VIEW by using the DROP VIEW statement.
Syntax:
The following is the syntax used to delete the view:
DROP VIEW [IF EXISTS] view_name; Parameters:
view_name: It specifies the name of the VIEW that we want to drop.
IF EXISTS: It is optional. If we do not specify this clause and the VIEW doesn’t exist, the DROP VIEW statement will return an error.
Example:
Suppose we want to delete the view “trainer” that we have created above. Execute the below statement:
DROP VIEW trainer; After successful execution, it is required to verify the view is available or not as below:

MySQL Create View with JOIN Clause
Here, we will see the complex example of view creation that involves multiple tables and uses a join clause.
Suppose we have two sample table as shown below:

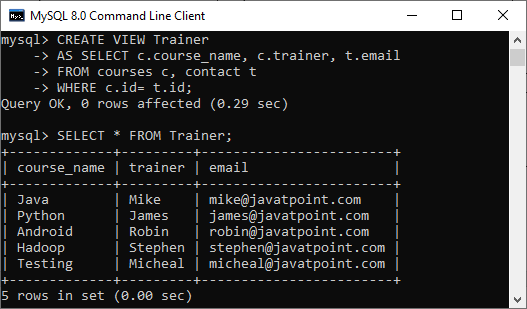
Now execute the below statement that will create a view Trainer along with the join statement
CREATE VIEW Trainer
AS SELECT c.course_name, c.trainer, t.email
FROM courses c, contact t
WHERE c.id = t.id;
We can verify the view using the SELECT statement shown in the below image:
Create View using MySQL Workbench
To create a view in the database using this tool, we first need to launch the MySQL Workbench and log in with the username and password to the MySQL server. It will show the following screen:
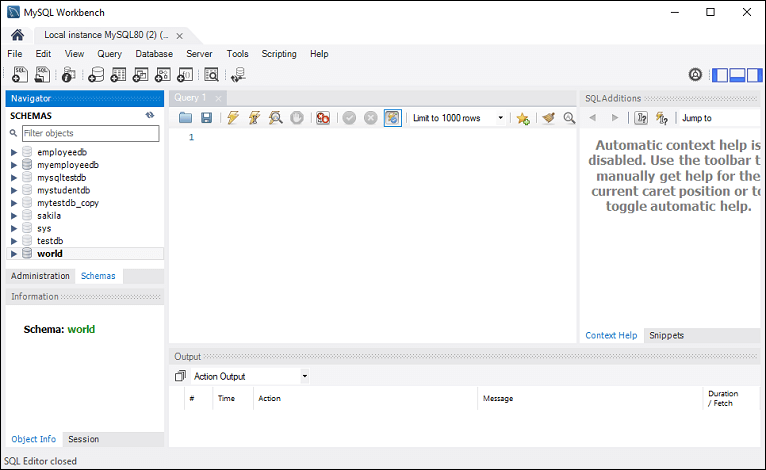
Now do the following steps for database deletion:
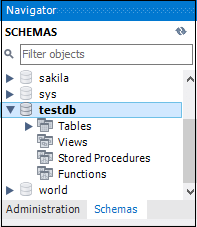
1. Go to the Navigation tab and click on the Schema menu. Here, we can see all the previously created databases. Select any database under the Schema menu, for example, testdb. It will pop up the option that can be shown in the following screen.
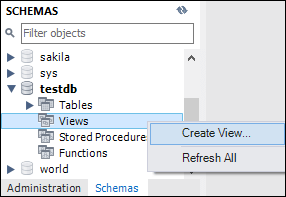
2. Next, we need to right-click on the view option, and a new pop up screen will come:
3. As soon as we select the “Create View” option, it will give the below screen where we can write our own view.
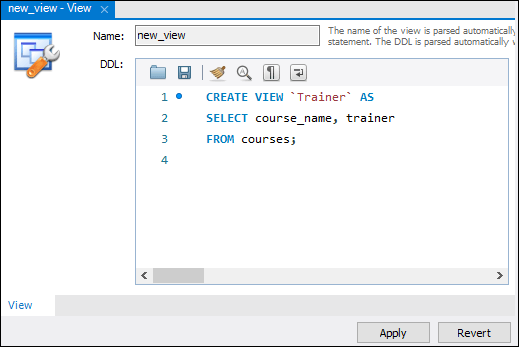
4. After completing the script’s writing, click on the Apply button, we will see the following screen:
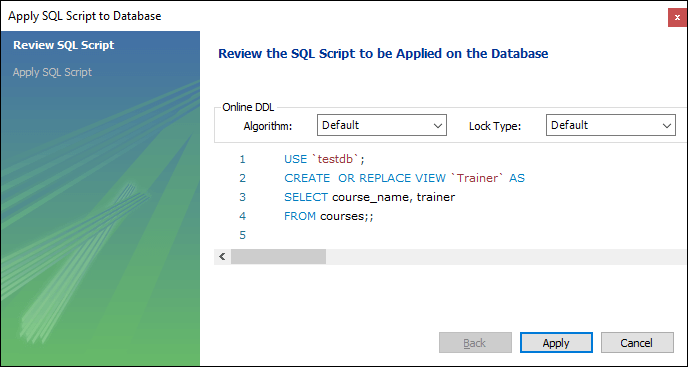
5. In this screen, we will review the script and click the Apply button on the database
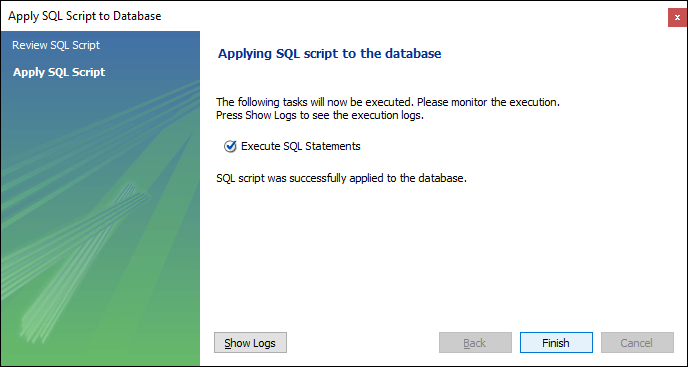
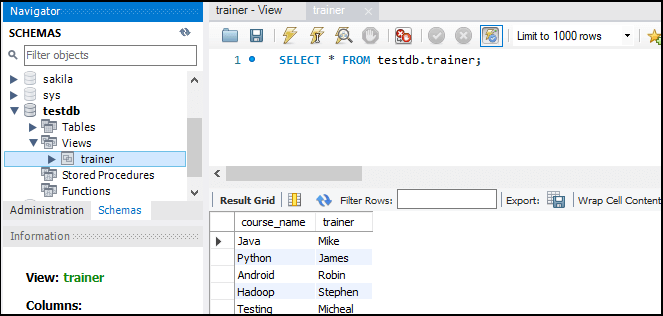
6. Finally, click on the Finish button to complete the view creation. Now, we can verify the view as below:
Why we use View?
MySQL view provides the following advantages to the user:
Simplify complex query
It allows the user to simplify complex queries. If we are using the complex query, we can create a view based on it to use a simple SELECT statement instead of typing the complex query again.
Increases the Re-usability
We know that View simplifies the complex queries and converts them into a single line of code to use VIEWS. Such type of code makes it easier to integrate with our application. This will eliminate the chances of repeatedly writing the same formula in every query, making the code reusable and more readable.
Help in Data Security
It also allows us to show only authorized information to the users and hide essential data like personal and banking information. We can limit which information users can access by authoring only the necessary data to them.
Enable Backward Compatibility
A view can also enable the backward compatibility in legacy systems. Suppose we want to split a large table into many smaller ones without affecting the current applications that reference the table. In this case, we will create a view with the same name as the real table so that the current applications can reference the view as if it were a table.
Leave a Reply