How can we Export and Import database in MySQL?
Database export and import in MySQL is a process of moving data from one place to another place. Export and import are useful methods for backing up essential data or transferring our data between different versions. For example, we have a contact book database that is essential for our business. It is necessary to keep it in a secure place. So we need to export it in a safe place, and whenever it lost from the original location, we can restore it using import options.
In MySQL, we can export and import database in mainly two ways:
- Command Line Tool
- MySQL Workbench
Let us discuss both ways of database exporting and importing in detail.
MySQL Export Database
Command Line Tool
Here, we are going to see database exporting, including tables using the command-line tool. So open the command-line tool using the username and password and perform the following steps:
Step 1: Execute the below statement to show all databases available on MySQL Server.
mysql> SHOW DATABASES; We will get the following output:
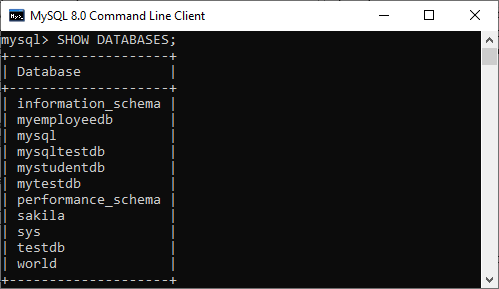
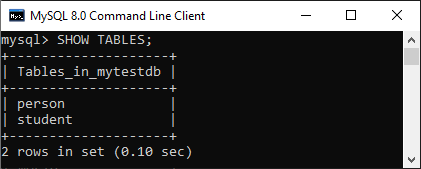
Step 2: From the above databases, we are going to take a database named “mytestdb” that contains the following table:
Step 3: Access the command line on the computer where the database is stored. You can open a DOS or terminal window to access the command line if you have physical access to the computer. For example, if we have installed the MySQL in the C folder, copy the following folder and paste it in our DOS command. Now, press Enter key.
C:\Users\javatpoint> CD C:\Program Files\MySQL\MySQL Server 8.0\bin Step 4: Now, we will use the mysqldump tool to export the database. This tool uses the login credentials of MySQL user for the operation. The following command is used to export the database in your desired place.
$ mysqldump -u username -p database_name > desiredplace\dbname.sql -u: It ensures MySQL username will be followed.
Username: It is the name of a user to which we can log in to the database.
-p: It ensures the password associated with the username.
database_name: It is the name of a database that we want to export.
>: It ensures the output location.
desiredplace\dbname.sql: The desired_place is the folder where we want to export, and dbname.sql is the file with which the output will be saved.
In the below statement, we will give a username: root, database name: mytestdb, folder name: BackupFile, and output database name: testdb.sql. Now, press the Enter key.
mysqldump -u root -p mytestdb > D:\BackupFile\testdb.sql Step 5: After pressing the Enter key, it will ask the password of the username we have specified. Then, press the Enter key again. It will create the backup file with a .sql suffix in the specified location. We will get the output as below that means the database exported successfully:

Finally, we can verify the export database, including tables in the specified folder.
MySQL Workbench
Here, we are going to see database exporting, including tables using MySQL Workbench. So open the workbench and type the password for the username.
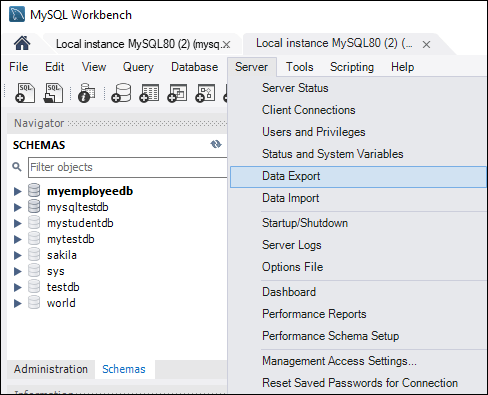
Step 1: Go to the Menu bar and click on the Server. A popup screen appears, then select the Data Export option, as shown in this screen. It will open a new window of data export settings and options.
Step 2: Select any database that you want. It will also display corresponding tables in the left section of the window. Here, we are going to select the mytestdb database. We can also choose multiple database checkboxes to include the database in the Export file. Similarly, we can select multiple tables.
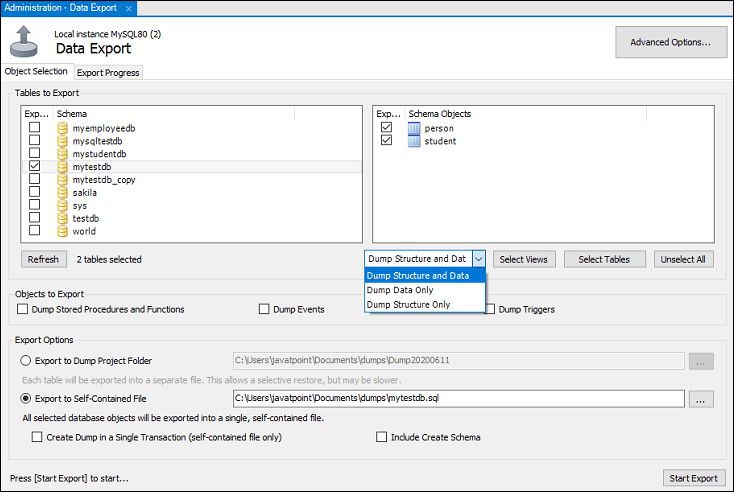
Step 3: After selecting the database, including all tables, go to the drop-down setting, and select any of the available options.
- Dump Data and Structure: It will save both table structure and data rows.
- Dump Data Only: It will save only the inserted rows in the tables.
- Dump Structure Only: It will save only the table structure, which are database columns and data types defined by us.
Step 4: In the Export option, we can see two radio buttons that are explained below.
- Export to Dump Project Folder: It will save all the tables as separate SQL files under one folder. It will be useful when you import or restore the export file one by one table.
- Export to Self-Contained File: It will store all the databases and tables in a single SQL file. It is a good option when you want to import all the databases, tables, and data rows using a single SQL file.
We can select the export path of our choice. Here, I will keep the default setting.
Step 5: Click the Start Export button, which displays the progress bar and log. Now, we can verify the export files in the Document folder in our system.

MySQL Import Database
Command Line Tool
Here, we are going to see database importing, including tables using the command-line tool. So open the command-line tool using the username and password and perform the following steps:
Step 1: Create a blank database named “mytestdb_copy” by using the below statement:
mysql> CREATE DATABASE mytestdb_copy; Step 2: Next, we need to execute the below commands to verify that it does not have any table.
  mysql> USE mytestdb_copy;

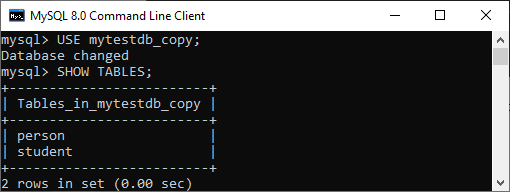
mysql> SHOW TABLES;
We can see the following output:

Step 3: Access the command line on the computer where the database is stored. You can open a DOS or terminal window to access the command line if you have physical access to the computer. For example, if we have installed the MySQL in the C folder, copy the following folder link and paste it in your DOS command. Now, press Enter key.
C:\Users\javatpoint> CD C:\Program Files\MySQL\MySQL Server 8.0\bin Step 4: Next, we will use the following command to import the dump file in your desired database.
$ mysql -u username -p database_name < desiredplace\dbname.sql In the below statement, we will give a username: root, database name: mytestdb_copy, location of backup file: BackupFile, and input database name: testdb.sql. Now, press Enter key.
$ mysql -u root -p mytestdb_copy < D:\BackupFile\testdb.sql Step 5: After pressing the Enter key, it will ask the password of the username we have specified. Then, press the Enter key again. If the command executed correctly, it does not display any content on the screen. We will get the below screen that means the database imported successfully:

Step 6: Open the MySQL client tool again and execute the below command to verify the database. In the output, we can see that this database now contains two tables:
MySQL Workbench
Here, we are going to see database importing using MySQL Workbench. So open the workbench and enter the password for the username.
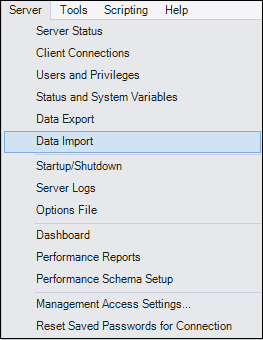
Step 1: Navigate to the Menu bar and click on the Server. A popup screen appears, then select the Data Import option, as shown in this screen. It will open a new window of data import settings and options.
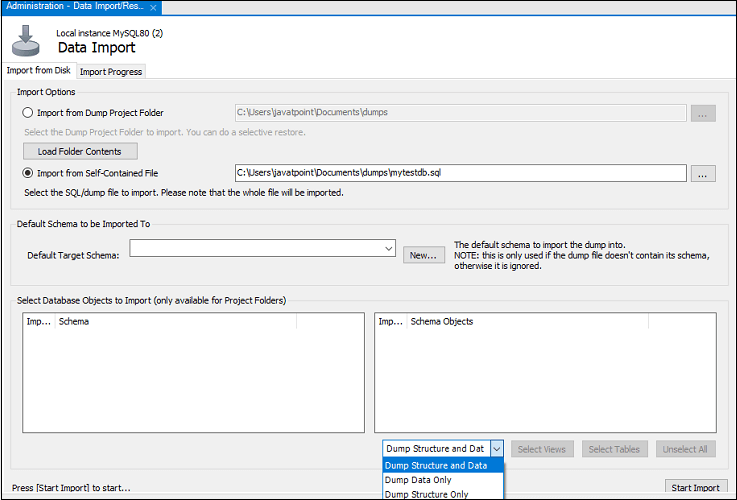
Step 2: In the screen, we can see the two radio options to import databases and tables, which are given below:
- Import from Dump Project Folder
- Import by using Self-Contained File
Step 3: Here, we will select ‘Import by using Self-Contained File’ and choose the desired database for importing from the Data Import option.
Step 4: Choose the ‘Dump Structure and Data’ option and click the Start Import button to import the databases and tables from the backup file. The following screen explains all the steps clearly:
Step 5: Now, navigate to the Schema under the navigator option on the left side of the workbench window and refresh it to see the currently imported database or table.
Leave a Reply