The SELECT statement in SQL Server is used to display all or specific records from the table. This statement allows us to fetch the records based on our needs or retrieve all records of the table.
Need of SELECT statement
The database can contain one or more tables, and each table stores our data in sequential order. The data in the table is organized in the form of rows and columns, similar to a spreadsheet. Each row represents the unique records, and the column represents the field in the table. SQL Server used schema to arrange the tables logically.
When we extract or fetch the required data from the table, we use queries written in SQL languages. The most basic statement used for such an operation is the SELECT statement.
Syntax
The following statement illustrates the most basic use of SELECT statement to fetch records from the table:
SELECT column1, column2,... columnN

FROM table1, table2....

[WHERE condition]

[GROUP BY column]

[HAVING condition]

[ORDER BY column];
If we want to fetch all columns from the table, we use the below statement:
SELECT * FROM tables; In this syntax, we have seen the following parameters:
Column or *: It indicates the field name of the table we want to fetch in the result set. We use the asterisk (*) when all columns need to be fetched.
Table: It indicates the name of the table from which we want to retrieve data. We can list more than one table.
WHERE: It’s an optional clause to filter the records based on the given condition.
GROUP BY: It’s an optional clause used to group the records based on single or multiple columns.
HAVING: It is an optional clause used with the GROUP BY clause to return only those rows whose condition is TRUE.
ORDER BY: It’s an optional clause used to arrange the table records in ascending or descending order.
Points to remember
- SQL Server will evaluate the FROM clause first, and then the SELECT clause will be evaluated.
- The SELECT * is not recommended to use in real-time databases as it fetches the data more than our requirements.
- The SELECT * query keeps the application performance slow.
- When a user adds new columns to a table, the SELECT * query fetches all of the columns, including the new ones, causing the application to crash.
SELECT Statement Example
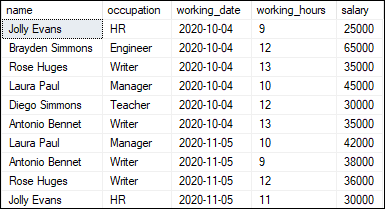
Let us understand how SELECT query works in SQL Server with the help of several examples. Suppose we have a table named “employee_info” that contains the following data:
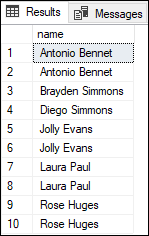
Example1: Suppose we want to fetch only one column (name) in a sorted manner from the table. We can get this data using the below statement:
SELECT name

FROM employee_info

ORDER BY name;
Executing the statement will get the following output that has only one column:
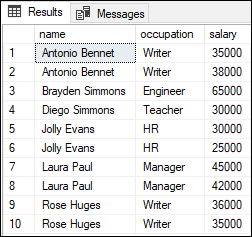
Example2: Suppose we want to fetch multiple columns in the sorted manner of their employee name from the table. We can get this data using the below statement:
SELECT name, occupation, salary

FROM employee_info

ORDER BY name;
Executing the statement will get the following output where we can see the name, occupation, and salary of employees:
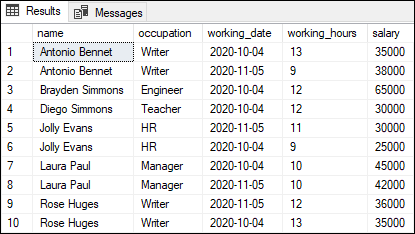
Example3: Suppose we want to retrieve all columns data of the table. In this case, either we need to write all column’s names with the select statement or use an asterisk (*) symbol in place of column names. Specifying all column names is not convenient for the user, so we usually use an asterisk (*) to retrieve all column data and save some typing. It is also useful to examine the columns and data of a table from which we are unfamiliar. Here is the query:
SELECT * FROM employee_info

ORDER BY name;
Executing the query will show the following output where we can see all columns of the table:
Example4: This example will explain the SELECT statement with the WHERE clause. The WHERE clause is used to filter data based on one or more columns. The following query will return all employees information whose working hour is greater than 10:
SELECT * FROM employee_info

WHERE working_hours > 10

ORDER BY name;
Executing the statement shows the below output:

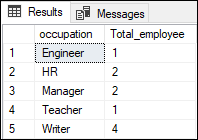
Example5: This example explains the SELECT statement with the GROUP BY clause, which is used to group the rows into groups based on single or multiple columns. The following statement shows occupation and number of employees in each occupation and then sort them in ascending order:
SELECT occupation, COUNT(*) AS Total_employee

FROM employee_info

GROUP BY occupation

ORDER BY occupation;
Executing the statement will display the expected result:
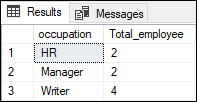
Example6: This example explains the SELECT statement with the HAVING clause. We use the HAVING clause to filter groups by using single or multiple columns. It is noted that the WHERE clause filters the records while the HAVING clause filter the groups. The following statement shows occupation and number of employees in each occupation which has more than one employee and then sort them in ascending order:
SELECT occupation, COUNT(*) AS Total_employee

FROM employee_info

GROUP BY occupation

HAVING COUNT(*)>1

ORDER BY occupation;
Executing the statement will display the expected result:
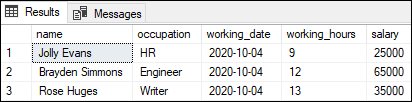
Example7: This example explains the SELECT statement with the TOP clause. The TOP clause shows the limited number of records from the table. It is noted that we must specify how many rows are returned in the TOP clause.
Suppose we want to get the first three records of the table. To fetch this detail, we use the query as below:
SELECT TOP(3) * FROM employee_info; Executing this query will return only the first three records as shown below:
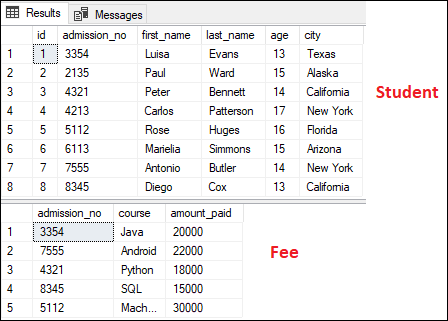
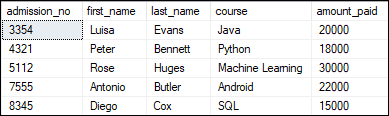
Example8: This example explains the SELECT statement with the JOIN clause. We use the JOIN clause to fetch the data from more than two tables.
We will take the two tables named “Student” and “Fee” to demonstrate this example. The following image shows the data of both tables:
Suppose we want to get the student information who have paid their course fees. In this case, we use the common column “admission_no” as a join condition to get data from both tables. Let us execute the below statement to fetch the required data from both tables:
SELECT Student.admission_no, Student.first_name, Student.last_name, Fee.course, Fee.amount_paid

FROM Student

INNER JOIN Fee

ON Student.admission_no = Fee.admission_no;
Executing the command will display the expected result:
Conclusion
This article will help us learn about the SELECT statement in detail, why we use it, and how to use it in the SQL Server to query data from a single table as well as multiple tables.
Leave a Reply