ALTER command in SQL Server is used to make modifications in an existing table. These alterations can be adding a column, deleting a column, changing the size, modifying the data type, adding or removing indexes, and adding or deleting constraints in a table definition. It also allows us to rename and rebuild partitions and disable and enable constraints and triggers. This article will explain all the alterations possible in a table with various examples.
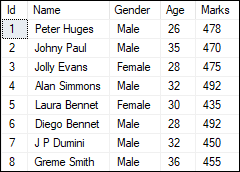
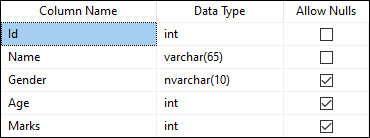
We are going to take a table named ‘Student’ for demonstration of all examples.
SQL Server Add New Column
A database developer several times need to add a new column to the existing table. They can do this by using the ALTER TABLE ADD COLUMN command. It will always add the new column at the last position in the table. The syntax to add a new column is given below:
ALTER TABLE table_name ADD column_name data_type column_constraints; In this syntax, we will first specify the table name that we want to modify. Then, we will specify the new column name that we want to add to the table. Finally, we will specify the data type and constraints for the column.
If we want to add more than one column, we can use the following syntax:
- ALTER TABLE table_name
- ADD column_name1 column_definition,
- ADD column_name2 column_definition;
Example
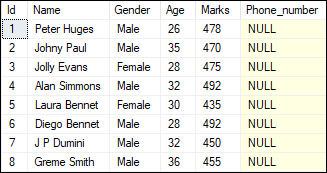
Suppose we want to add a new column ‘Phone_number‘ into the Student table. We can do this by using the below command:
ALTER TABLE Student ADD Phone_number VARCHAR(20) NULL; We can verify the newly inserted column in the table using the SELECT statement. See the below image where the column is added as the last column in the table:
SQL Server Delete Column
We can also use the ALTER command to remove single or multiple columns from the table. SQL Server provides the ALTER TABLE DROP COLUMN statement to delete the existing column from the table. To do this, we can use the following syntax:
ALTER TABLE table_name DROP COLUMN column_name; In this syntax, we will first specify the table name in which we want to make the modification. Then, we will specify the column name that we want to remove from the table after the DROP COLUMN clause.
If we want to delete more than one column, we can use the following syntax:
ALTER TABLE table_name

DROP COLUMN column_name1, DROP COLUMN column_name2...
Example
Suppose we want to drop a ‘Phone_number’ column from the Student table. We can do this by using the below command:
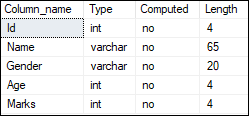
ALTER TABLE Student DROP COLUMN Phone_number; We can verify whether this column is deleted or not from the table using the below statement:
EXEC sp_help 'dbo.Student'; See the below image where the phone_number column is no longer available in the table:
SQL Server Modify Column Data Type
We can also use the ALTER command to change the column’s data type into the specified table. SQL Server provides the ALTER TABLE ALTER COLUMN statement to modify the column data type. We can do this by using the following syntax:
ALTER TABLE table_name ALTER COLUMN column_name new_data_type(size); In this syntax, we will first specify the table name in which we want to make the modification. Then, we will specify the column name that we are going to modify and finally define its new data type with size.
We must ensure that old and new column data types must be compatible. Otherwise, SQL Server gives a conversion error if the column contains a value.
Example
We have already defined the ‘Gender’ column’s datatype of the ‘Student’ table as ‘VARCHAR’ and length 20. Now, we want to change it from VARCHAR to NVARCHAR, and the size is 10. To do this, we will use the following syntax:
ALTER TABLE [Student] ALTER COLUMN Gender NVARCHAR(10); We can verify whether this column is changed or not from the table design option in SQL Server Management Studio as below:
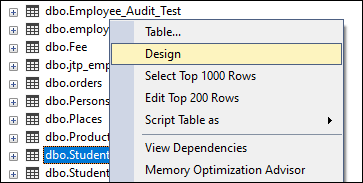
See the below image where we can see that the Gender column data type is changed successfully in the table:
Add Constraint on the Column
We can also use the ALTER command to add or remove the constraints into the specified table. SQL Server provides the ALTER TABLE ADD CONSTRAINT statement for adding a constraint to the specified column. The following syntax illustrates this alteration:
ALTER TABLE table_name

ADD CONSTRAINT [constraint_name] PRIMARY KEY ([column_name])
In this syntax, we will first specify the table name in which we want to make the modification. Next, we will specify the constraint name after the ADD keyword. Next, specify the constraint type such as PRIMARY KEY, FOREIGN KEY, UNIQUE, NOT NULL, CHECK, and DEFAULT, and finally define the column name.
Example
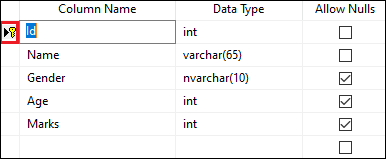
Suppose we want to add a PRIMARY KEY constraint on the Id column into the Student table. We can do this by using the below statement:
ALTER TABLE Student ADD CONSTRAINT PrimaryKey PRIMARY KEY (Id); After successful execution, we can verify whether the primary key is added or not in the Id column using the table design option in SQL Server Management Studio. In the below image, we can see that the primary key is added successfully in the column:
Drop Constraint on the Column
SQL Server provides the ALTER TABLE DROP CONSTRAINT statement for removing constraints from the specified column. The following syntax illustrates this alteration:
ALTER TABLE table_name DROP CONSTRAINT [constraint_name] In this syntax, we will first specify the table name in which we want to make the modification. Next, we will specify the constraint name after the DROP CONSTRAINT keyword.
Example
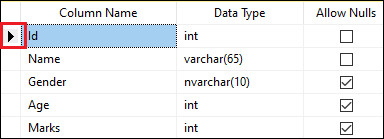
Suppose we want to drop the above-created constraint on the Id column from the Student table. We can do this by using the below statement:
ALTER TABLE Student DROP CONSTRAINT PrimaryKey; After successful execution, we can verify whether the primary key is deleted or not from the Id column using the table design option in SQL Server Management Studio. In the below image, we can see that the primary key is deleted successfully:
Add a NOT NULL Constraint to a NULLABLE Column
We can also change the nullable column into a NOT NULL column. To do this, we first need to update the NULL to non-null and then add the NOT NULL constraint to the column.
Example
The Age column of the Student table allows us to store null values. If we want to change it from null to NOT NULL, we must update NULL to non-null first using the below statement:
UPDATE Student SET Age = '' WHERE Age IS NULL; Now, we can add the NOT NULL constraint using the below statement:
ALTER TABLE Student ALTER COLUMN Age VARCHAR (10) NOT NULL; Let us insert a row without containing a value into the Age column:
INSERT INTO Student (Name, Gender, Marks) VALUES

('Maria Smith', 'Female', 435);
We will get the following error:
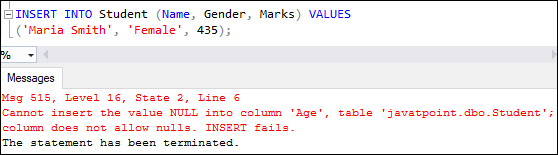
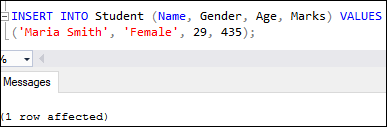
However, if we insert a value into the Age column, it will be executed successfully:
INSERT INTO Student (Name, Gender, Age, Marks) VALUES

('Maria Smith', 'Female', 29, 435);
Here is the output:
In this article, we have learned about the ALTER command in SQL Server to change the properties of an existing column using various examples in the defined table.
Leave a Reply