The <label> tag is used to specify a label for an <input> element of a form. It adds a label to a form control such as text, email, password, textarea etc. It toggles the control when a user clicks on a text within the <label> element.
Syntax:
<label> form_content... </label> This tag can be used with the following two ways:
1. Set the id attribute inside the <input> element and specify its name for the for attribute inside the <label> tag.
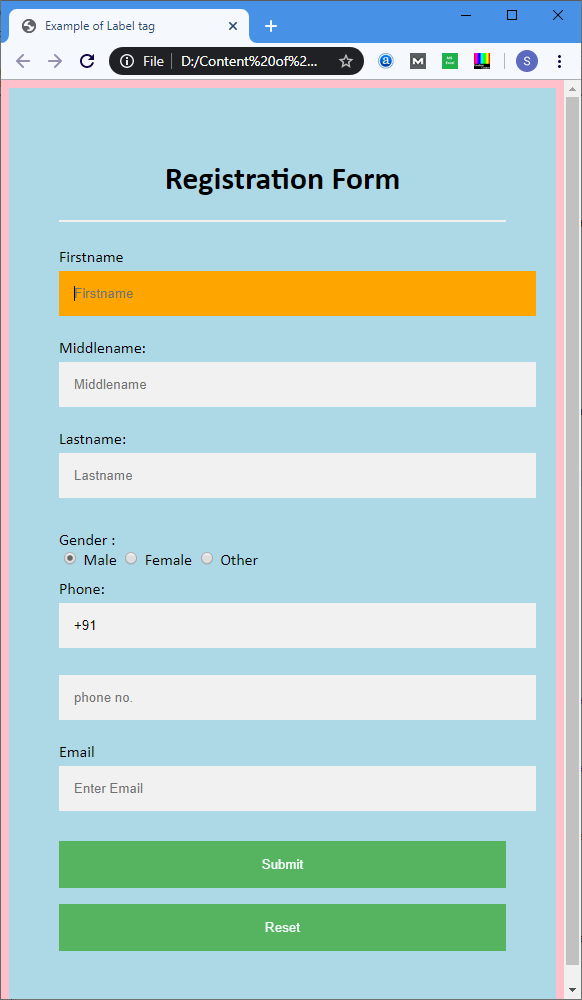
Example: This example uses the for attribute with each label tag used in the form.
C!DOCTYPE html>

<html>

<head>

<meta name="viewport" content="width=device-width, initial-scale=1">

<title>

Example of Label tag

</title>

<style>

/* The following tag selector body use the font-family and background-color properties for body of a page*/


body {

font-family: Calibri, Helvetica, sans-serif;

background-color: pink;

}

/* Following container class used padding for generate space around it, and also use a background-color for specify the color lightblue as a background */

.container {

padding: 50px;

background-color: lightblue;

}

/* The following tag selector input use the different properties for the text filed. */

input[type=text] {

  width: 100%;

  padding: 15px;

margin: 5px 0 22px 0;

display: inline-block;

 border: none;

 background: #f1f1f1;

}

input[type=text]:focus {

background-color: orange;

outline: none;

}

 div {

            padding: 10px 0;

}

hr {

  border: 1px solid #f1f1f1;

  margin-bottom: 25px;

}

/* The following tag selector button uses the different properties for the Button. */

button {

  background-color: #4CAF50;

  color: white;

  margin: 8px 0;

  border: none;

  cursor: pointer;

  padding: 16px 20px;

  width: 100%;

  opacity: 0.9;

}

/* The following tag selector hover uses the opacity property for the Button which select button when you mouse over it. */

button:hover {

opacity: 1;

}

</style>

</head>

<body>

<form>

<div class="container">

<center>  <h1> Registration Form</h1> </center>

<hr>

<label for="firstname">

Firstname

</label>

<input type="text" id="firstname" name="ftname" placeholder= "Firstname" size="15" required />

<label for="middlename">

Middlename:

</label>

<input type="text" id="middlename" name="mname" placeholder="Middlename" size="15" required />

<label for="lastname">

Lastname:

</label>

<input type="text" id="lastname" name="ltname" placeholder="Lastname" size="15"required />

<div>

<label for="gender">

Gender :

</label>

<br>

<input type="radio" id="gender" value="Male" name="gender" checked > Male

<input type="radio" id="gender" value="Female" name="gender"> Female

<input type="radio" id="gender" value="Other" name="gender"> Other


</div>

<label for="Phone">

Phone:

</label>

<input type="text" name="country code" placeholder="Country Code"  value="+91" size="2"/>

<input type="text" id="Phone" name="phone" placeholder="phone no." size="10"/ required>

<label for="email">

Email

</label>

<input type="text" id="email" placeholder="Enter Email" name="email" required>

<button type="submit" value="submit">Submit</button>

<button type="reset" value="submit">Reset</button>

</form>

</body>

</html>
Output:

2.We can also use the <input> tag within the <label> element in a form.
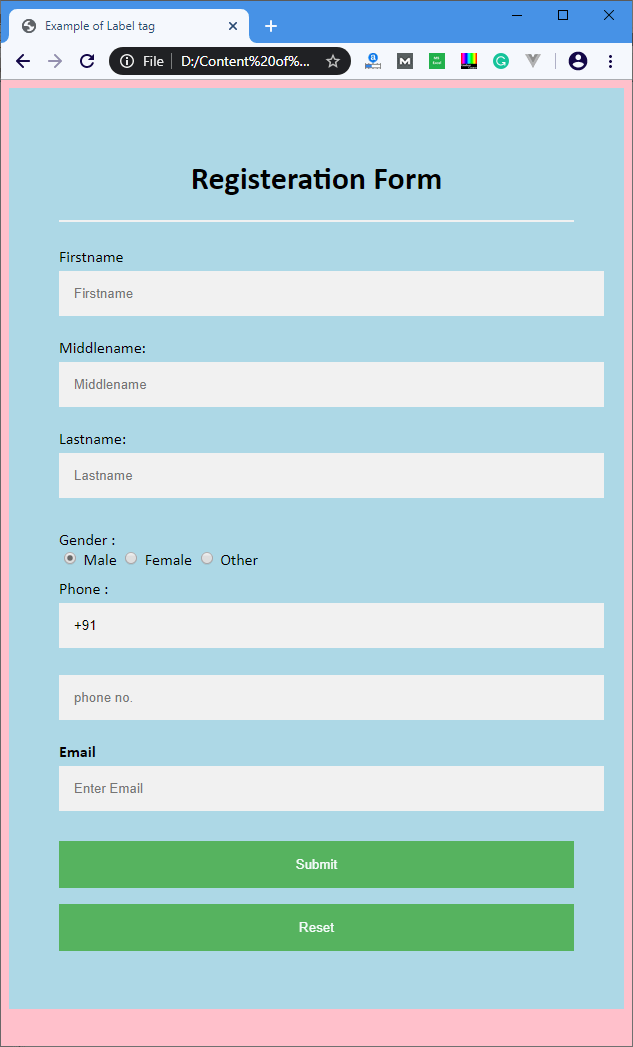
Example: This example uses the <input> tag within the </label> element in a form.
<!DOCTYPE html>

<html>

<head>

<meta name="viewport" content="width=device-width, initial-scale=1">

<style>

/* The following tag selector body use the font-family and background-color properties for body of a page*/

body{

font-family: Calibri, Helvetica, sans-serif;

background-color: pink;

}

/* Following container class used padding for generate space around it, and also use a background-color for specify the color lightblue as a background */

.container {

padding: 50px;

background-color: lightblue;

}

/* The following tag selector input use the different properties for the text filed. */

input[type=text] {

  width: 100%;

  padding: 15px;

margin: 5px 0 22px 0;

display: inline-block;

 border: none;

 background: #f1f1f1;

}

input[type=text]:focus {

background-color: orange;

outline: none;

}

 div {

            padding: 10px 0;


        }


hr {

  border: 1px solid #f1f1f1;

  margin-bottom: 25px;

}

/* The following tag selector button use the different properties for the Button. */

button {

  background-color: #4CAF50;

  color: white;

  padding: 16px 20px;

 border: none;

  cursor: pointer;

 margin: 8px 0;

  width: 100%;

  opacity: 0.9;

}


button:hover {

opacity: 1;

}


</style>

</head>

<body>

<form>

<div class="container">

<center>  <h1> Registration Form </h1> </center>


<hr>

<label> Firstname

<input type="text" name="firstname" placeholder= "Firstname" size="15" required />

</label>

<label> Middlename:

<input type="text" name="middlename" placeholder="Middlename" size="15" required />

</label>

<label> Lastname:

<input type="text" name="lastname" placeholder="Lastname" size="15"required />

</label>

<div>

<label>

Gender :

<br>

<input type="radio" value="Male" name="gender" checked > Male

<input type="radio" value="Female" name="gender"> Female

<input type="radio" value="Other" name="gender"> Other

</label>


</div>

<label>

Phone :

<input type="text" name="country code" placeholder="Country Code"  value="+91" size="2"/>

<input type="text" name="phone" placeholder="phone no." size="10"/ required>

</label>


<label>

<b>

Email :

</b>

<input type="text" placeholder="Enter Email" name="email" required>

</label>

<button type="submit" value="submit">Submit</button>

<button type="reset" value="submit">Reset</button>

</form>

</body>

</html>
Output: The output of this example is also same as the first but the difference between them is the implementation.

Attributes
The following table describes all the attributes of the <label> tag:
Attributes Description
for It defines the form element that a label is describing.
form It defines a form to which a label belongs.
Supporting Browsers
| Element |  Chrome Chrome |  IE IE |  Firefox Firefox |  Opera Opera |  Safari Safari |
| <label> | Yes | Yes | Yes | Yes | Yes |
Leave a Reply